As every option available in Azure and particularly talking about SQL, for the classic question about What option is better for me? The classic answer is still valid and this is “It depends”. Your necessity or your business workload or architectural design would influence in a determinant way with your decision.
In this article, I am going to explain in a sort of step-by-step guide an approach for configuring a new Azure SQL Managed Instance from now in advance called simply SQL MI. It is so important to distinguish that exist different ways to arrive at the same result, but the most important is to understand the core concepts.
The first aspect to take into account is to decide the naming convention, for this article I am going to use self-descriptive in a way that it has more educational. We have to define the name of our resource, remember that in short words it would be a logical container where we group a set of Azure resources tied to a specific subscription.
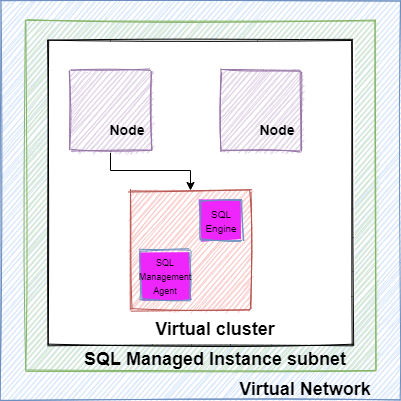
In general terms, the SQL Managed Instances are part of a virtual cluster and are in a subnet inside a virtual network. It is mandatory to keep the subnet dedicated to the managed instances. This image shows you a high-level architecture of the components from the perspective of networking components.

SQL Managed instance has a group of Network requirements, mainly the subnet must have the following characteristics:
- Dedicated Subnet
- Sufficient IP addresses
- Subnet delegation
- Network security group (NSG)
- User defined Route Table
In this link you can find in details more information about it:
We are going to create a new SQL Managed Instance, but we have to start with the creation of a new resource which we are going to call AzureLabsSQL, through this article are mainly being using Azure CLI and Azure PowerShell console from the Azure Portal. Inside Azure Portal locate the icon for Cloud Shell which is at the top of the Portal site, the icon looks like this image

Immediately it opens a new window in the below section of your portal site, so in our case, we are going to use Azure CLI, so is required to type az for starting to execute Azure CLI commands.

The next command will create the new resource group, in my case the -l (location) would be UK South, and -n(name) is AzureLabsSQL
az group create -l "UK South" -n AzureLabsSQL
We are ready for building the SQL MI, I mentioned we must create the VNetwork and Subnet in advance, you should execute the following commands into Azure CLI:
az network vnet create -g AzureLabsSQL  -n VNetAzureSQL

az network vnet subnet create -g AzureLabsSQL --vnet-name VNetAzureSQL -n SubnetSQLMi --address-prefixes 10.0.0.0/24
At this point we have deployed the new objects, a VName called VNetAzureSQL and a Subnet called SubnetSQLMi. We have to delegate the subnet; it is a requirement to enable the subnet and prepare it to associate it to the new SQL Managed Instance. It is required to get the subscriptionId before executing the following PowerShell script:
$scriptUrlBase = 'https://raw.githubusercontent.com/Microsoft/sql-server-samples/master/samples/manage/azure-sql-db-managed-instance/delegate-subnet'

$parameters = @{
    subscriptionId = '2f97b493-86b0-4b7b-b0f1-cba5e3f42dfa'
    resourceGroupName = 'AzureLabsSQL'
    virtualNetworkName = 'VNetAzureSQL'
    subnetName = 'SubnetSQLMi'
    }

Invoke-Command -ScriptBlock ([Scriptblock]::Create((iwr ($scriptUrlBase+'/delegateSubnet.ps1?t='+ [DateTime]::Now.Ticks)).Content)) -ArgumentList $parameters
This script prepares the subnet in three steps:
- Validate: It validates the selected virtual network and subnet for SQL Managed Instance networking requirements.
- Confirm: It shows the user a set of changes that need to be made to prepare the subnet for SQL Managed Instance deployment. It also asks for consent.
- Prepare: It properly configures the virtual network and subnet.
In my case, I did not already create the Route Table and the Network security group (NSG), but the script allows us to create it automatically.

After type the letter y it would create the new object and associate them to the Subnet and VNet, my recommendation is to allow the script to be in charge of the creation of these objects because they will be ready and properly configured for SQL Manage Instance. For verifying that everything is right, you could go to the resource group and check the new object, for instance:


At this point, we are ready to execute the script for deploying our new SQL Managed Instance, this step will take several hours, why? Because it is deployed in complete isolation and brings additional security benefits, but the cons are that the provisioning and scaling up can take several hours.
az sql mi create -g AzureLabsSQL -n ManageInstanceLab -l "UK South" -i -u AdminSQL -p Ideragulag2021+ --subnet /subscriptions/2f97b493-86b0-4b7b-b0f1-cba5e3f42dfa/resourceGroups/AzureLabsSQL/providers/Microsoft.Network/virtualNetworks/VNetAzureSQL/subnets/SubnetSQLMi --capacity 4
--storage 32GB --edition GeneralPurpose --family Gen5
Once that you have executed the previous script, you should have to wait some hours, but it is possible to open another portal window and check the advances in the creation of this new SQL MI.

After some hours it should complete and you can go to your new SQL MI and see that it was deployed correctly as this image shows:

Once the process would be completed, we have to start working on aspects related to the connectivity, as I mentioned at the beginning of this article, I want to access the new SQL MI from my on-premises Server, this aspect is so important to determine the connectivity infrastructure, the following image bring you a brief idea about the options available for your new server.

In our case is fundamental to configure a Gateway subnet (Azure VPN Gateways) first, because his definition provides cross-premises connectivity between customer premises and Azure. Here is a simple image of it.

Creating a VPN Gateway is mandatory for the scenario where we have to connect from an on-premises environment, you can do it in multiple ways, but in my case, I am going to use directly the Azure Portal, in the following links you can go in deep about the explanation about different approaches
https://docs.microsoft.com/en-us/azure/vpn-gateway/tutorial-site-to-site-portal
Inside of the VNet you have to click on the Subnet option

Once you click in there, the following step consists in creating a Gateway Subnet click on the Gateway subnet button

And assign a specific range of IPs like this

Before advancing with the configuration, is mandatory to use a certificate for the creation of a new VPN Gateway, remember that is mandatory for enabling the communication with the on-premise Server which is the scenario that I am presenting in this article. Each virtual network can only have one virtual network gateway of each type. Regardless of how was generated the certificate, it is mandatory as part of the proper configuration, it could be generated for our company, or in case of not having we should generate it.
Here, we are going to generate a new certificate, you could get more details about this process in the following article:
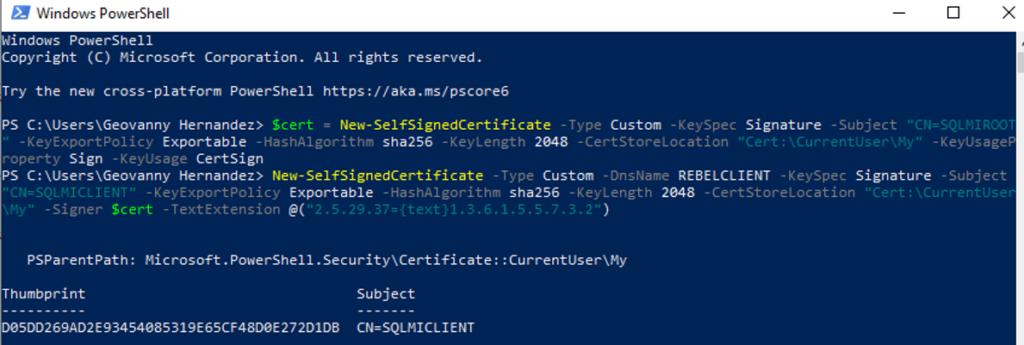
First of all, open PowerShell and execute the following instructions, you can feel free of customizing the name of your certificate, we start with the root and later the client certificate.
--Generating a root certificate
$cert = New-SelfSignedCertificate -Type Custom -KeySpec Signature -Subject "CN=SQLMIROOT" -KeyExportPolicy Exportable -HashAlgorithm sha256 -KeyLength 2048 -CertStoreLocation "Cert:\CurrentUser\My" -KeyUsageProperty Sign -KeyUsage CertSign

--Generating a client certificate
New-SelfSignedCertificate -Type Custom -DnsName REBELCLIENT -KeySpec Signature -Subject "CN=SQLMICLIENT" -KeyExportPolicy Exportable -HashAlgorithm sha256 -KeyLength 2048 -CertStoreLocation "Cert:\CurrentUser\My" -Signer $cert -TextExtension @("2.5.29.37={text}1.3.6.1.5.5.7.3.2")
After execute successfully the previous script you should see an output like this

For checking that the certificates are in place, you can enter the certification manager and verify it.


Once that we have created and verified the new certificate, we must export them, starting with the Root Certificate (SQLMIROOT), pointed out the certificate and right-click – All Task – Export and choose the options as the images show


With respect to the Client certificate, it is not mandatory to export it, at least for the scope of this article, because only root cert will be used in Azure VPN, besides that, the client certificate can install on other computers which need P2S connections.
At this point, we have the raw material for continuing to advance. The following point consists in create a new VPN Gateway. Inside the Azure Portal, go to All Services and search Virtual Network Gateway, once in there click on the button Create and fill, remember the most important is that the new Gateway belongs to the same subscription and region as the target Virtual Network which would be associated to the new Gateway. In our case, the features related to the Gateway and VPN type are the following:

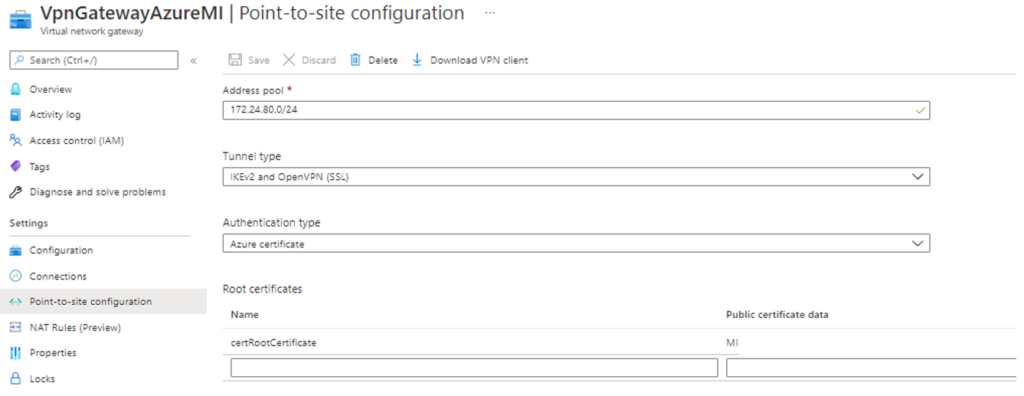
After completed, we should go to Point-to-site-configuration and fill a group of items

The Address pool is composed of a range of IPs that belong to our target IP inside the Network where we have hosted the on-premises Server. In my case I simply did an ipconfig and got the range that I will use:

With respect to the Root certificates section, the steps to follow for filling the pair Name/Certificate data, you have to open the generated Certified in the previous section. You could open the Certificate with Notepad and copy the section without BEGIN CERTIFICATE and END CERTIFICATE.


At this point, you should log in to the same pc where we generate certificates. If you are planning to use a different pc, you must import the root certificate and the client certificates previously exported. Inside Azure Portal, you must click on Point-to-site configuration in the VPN Gateway recently configured and click Download VPN Client

Once it has been downloaded, you can explore the zip file which contains the different platforms available.

Based on the OS of your pc, install the proper version required and go to VPN and check it has been installed correctly.

After that, you should click Connect and it shows you the following image:

You are able to verify IP allocation from the VPN address pool, open CMD, and type ipconfig and you must see an additional section that has the name of the Virtual Network created from the beginning.

Now that we are sure about the connectivity using our certificate, so we are able to connect from our pc to the new and shiny Azure SQL Managed Instance, what do you need to do? Basically, open the client app, in my case SQL Server Management Studio (SSMS), and type the Server Name, and provides our user/password configured in this article. After to fill the requested fields as this image:

Finally, we have our instance ready for starting to work on it.

Conclusion
Throughout this article, we were describing and configuring all the pieces required to have our new Azure SQL Managed Instance properly configured and ready to be accessed from the on-premises app. It does include some non-conventional components as the generation of own certificates. I really hope this little introduction would be useful and you can start to play about the benefits of this great option available in the Azure ecosystem as Managed Instance represents. Keep in mind that before adopting SQL Managed Instance you should carefully think if it is the right option for your workload and real necessity and requirements if your requirements match with the great advantage offered by SQL MI, so I encourage you to start playing without fear but keep in mind that the security and cost is something you always must put first.

