This article is the second of the series about configuring a Cassandra Cluster in Azure. In the previous one we completed the installation of Cassandra in a new Virtual Machine (VM) in Azure, this VM will become our template for creating new nodes based on it. In this article we will be covering the next sections:
- Localize key files
- Configuring our Cluster (cluster name, seed nodes)
- Adding more configuration to Cassandra through yaml file
- Configuring RPC (service, interface, and address)
- Deleting data directory
Stopping Cassandra Service
We must stop the Cassandra Service because in advance we have to change some important configuration that depends entirely on modifying cassandra.yaml and these changes are only available meanwhile the service is down. The process of stopping the Cassandra Service would depend on the sort of installation approach used by us, in this article we used tarball installation, so a couple of commands are the right answer for stopping the service, first, we have to find the process id corresponding to Cassandra and kill it in the second command. The following script shows you the commands:
pgrep -f CassandraDaemon
kill number_process_returned_above
Note: In case of having a standard installation you simply need to execute: sudo service cassandra stop
Localize key files
First of all, before continuing doing so important configuration changes, we need to know where these files are, we can start with the cassandra.yaml file, this is the heart of the main configurations on Cassandra nodes, every change that we apply in there will have a direct impact inside of the behavior of our node, controlling basic information as the Cluster Name until the seed nodes and IP address information.
A complete explanation of this file can be found in the following link:
https://docs.datastax.com/en/cassandra-oss/3.0/cassandra/configuration/configCassandra_yaml.html
This file can be in the following directories:
Cassandra package installations: /etc/cassandra
Cassandra tarball installations: install_location/conf
In these articles, we have been working with Cassandra tarball installations and we already apply some changes at bashsrc file, so in this case, you can find the cassandra.yaml directly with the following command:
cd $CASSANDRA_HOME/conf
Configuring our Cluster (cluster name, seed nodes)
Well, it is time to start modifying our cassandra.yaml file, remember always stop the Cassandra Service before modifying this file, in our case we already did it. The changes that we are going to do are basically renaming our Cluster and adding a group of seed nodes.
Before continuing teaching you how to apply these changes, I want to do a brief explanation about why these changes are required, first of all, the cluster name is mainly used to prevent machines in one logical cluster from joining another, so this step is very important during the design and implementation of every new Cassandra Cluster, for the purpose of this article we will use the cluster name <<My Cluster>>. In the other hand, setting up the seed nodes represent a key step for allowing to every new node being able to join the cluster through communication with some of the seed nodes and it is configured inside the cassandran.yaml file.
Here are more details about these topics which are out of the scope of this series, however, I wanted to bring you at least a simple definition or comments about them.
https://docs.datastax.com/en/cassandra-oss/3.0/cassandra/initialize/initSingleDS.html
The proposed nodes and IPs to be configured as part of the cluster and using thought this article would be:
| Node | IP Address | Seed |
|---|---|---|
| cassnode1 | 10.0.0.4 | ✓ |
| cassnode2 | 10.0.0.6 | ✓ |
| cassnode3 | 10.0.0.8 |
Starting at this point, we are going to amend the little changes to the cassandra.yaml file, cluster name, and seed nodes, again, you can find the most suitable editor for you, I use vi, once you have opened the yaml file need to change the properties mentioned before as I am showing you in the image below:


Note: Remember that our architecture proposed we have privates IP which are inside the same VNet, if you want to configure multinetwork interfaces or using different regions in cloud implementations must use public IPs, more details here: https://cutt.ly/OfXnibg
Adding more configuration to Cassandra through yaml file
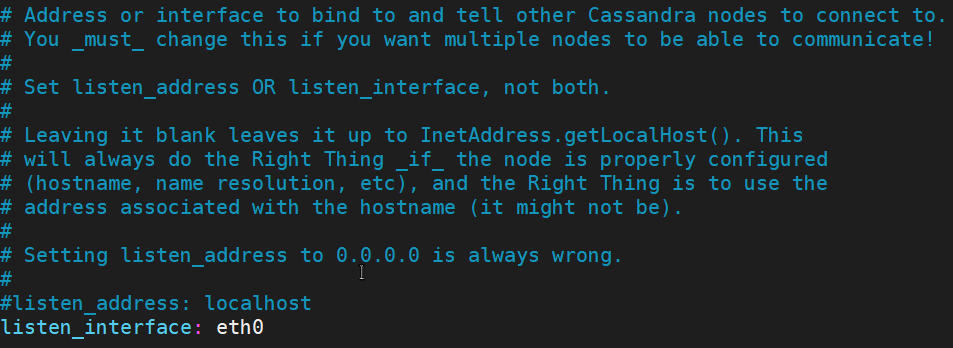
Without leaving the edition of yaml we continue modifying a group of features like listen interface, rpc interface, broadcast rpc address, and endpoint snitch. Please refer to the official DataStax documentation for a deep explanation of these properties, for keeping as simple and functional as possible I am limiting the scope and content to specific values, the following images show you every one of them.
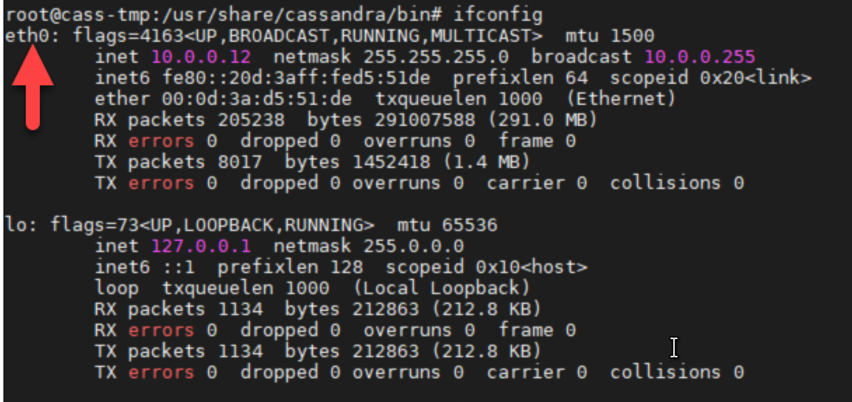
Before continuing with the setup, you must find the value of your ethernet card interface ID, simply type ifconfig and copy the value as the arrow indicate

Keeping that vale because we will be using in the RPC interface configuration, starting with commenting the listen address and adding the listen interface:


In the model VM template we set up the value with the IP: 10.0.0.10, however, it would be replaced in any new node after to clone it and assign the private IP which corresponds to the new node


Deleting data directory
In this stage, we have to delete a group of Cassandra directories, remember that these directory are recreated once that the new node is starting Cassandra Service, we need to delete these directories because we want to create our new template or model node, so in this way we will have a clean and shiny node ready to be cloned without any concern related to previous data or configuration.
Execute these commands to delete the content of Cassandra directories:
sudo rm -rf /usr/share/cassandra/data/system/*
sudo rm -rf /usr/share/cassandra/data/saved_caches/
sudo rm -rf /usr/share/cassandra/data/data/
sudo rm -rf /usr/share/cassandra/data/commitlog/
Note: Remember that we use the parameters -rf for deleting in a recursive approach and without necessity of request confirmation from the user.
We have done all the steps required for having our model VM ready in terms of Cassandra configuration, keeping a consistent group of features, and bring us the opportunity to reuse this node as a template for adding a new node, however, is still pending to complete the last step to becoming this VM in a generalized VM in Azure, so for the last article of this series, we will be addressing all the details concerning to the setup of our Cassandra Cluster in Azure.
